The cache aside pattern
A comprehensive overview of the cache aside pattern with Redis.

making the hard concepts simple for everyone
Welcome back, this is part 3 of the "caching patterns with Redis" series. Click here to get to the second part.
This is the most common and the easiest caching pattern. To see how this pattern functions, consider the image below.
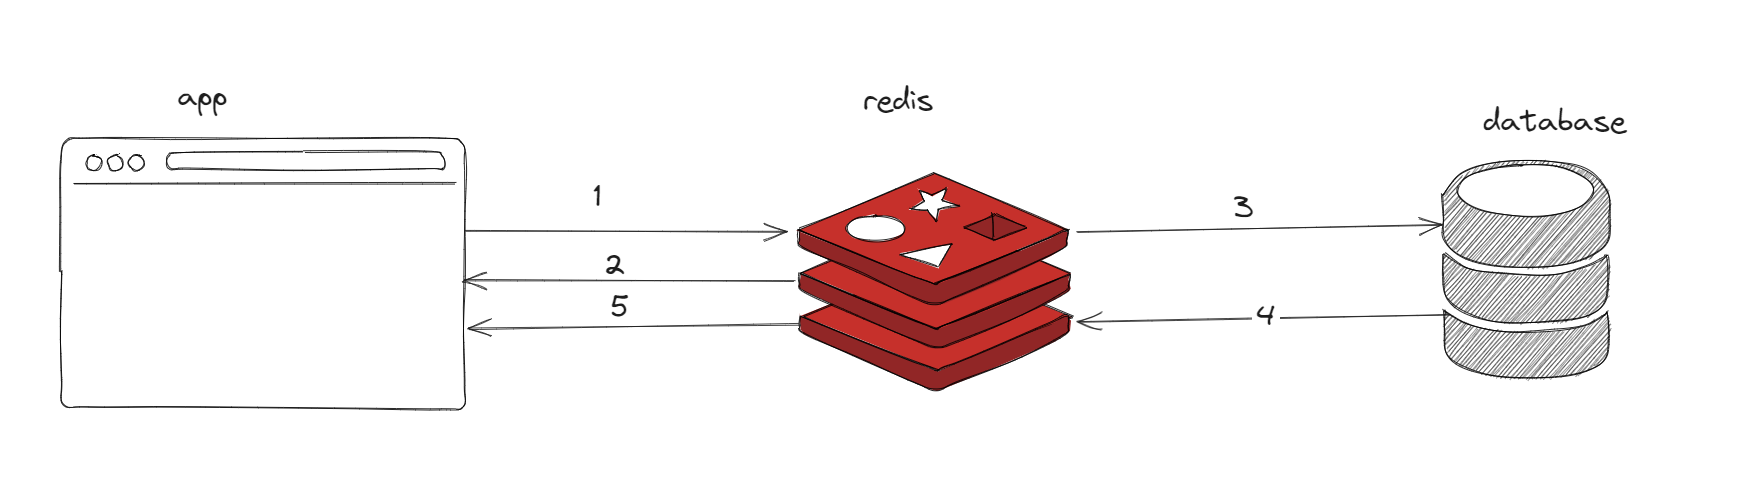
When your application needs to read data from the database, it checks the cache first to determine whether the data is available.
If the data is available (a cache hit), the cached data is returned, and the response is issued to the caller/application.
If the data isn’t available (a cache miss), the database is queried for the data.
The cache is then populated with the data that is retrieved from the database.
The data is returned to the caller.
This approach has a couple of advantages:
The cache contains only data that the application requests, which helps keep the cache size cost-effective.
Implementing this approach is straightforward and produces immediate performance gains, whether you use an application framework that encapsulates lazy caching or your custom application logic.
A disadvantage when using cache-aside as the only caching pattern is that because the data is loaded into the cache only after a cache miss, some overhead is added to the initial response time because additional roundtrips to the cache and database are needed.
Let's see how we can use the cache aside pattern to speed up our posts application. Considering that users must be authenticated on every request for CRUD operations on posts and comments, the authentication layer should be super fast to improve performance. We'll verify the JWT token, get the user from the cache and attach the user to the request.
export const getUserByEmail = async (email: string): Promise<IUser | null> => {
  // Cache aside to improve performance.

  // 1. Get user from redis
  const userString = await redis.get("user-" + email);
  // 2. If user: return user
  if (userString && userString !== "null") {
    return JSON.parse(userString);
  }

  // 3. User not in cache. Get user from DB
  const user = await db.users.findUnique({
    where: { email },
    select: { email: true, name: true, id: true },
  });

  // 4. Cache the user
  await redis.set("user-" + email, JSON.stringify(user));

  // 5. Return the user
  return user;
};

// Auth middleware
export const authMiddleware = async (
  req: Request,
  _res: Response,
  next: NextFunction
) => {
  try {
    // Auth token in passed in aid header
    const aid = req.headers["aid"] as string;
    if (!aid) {
      throw new Error("Auth token has not been provided");
    }
    // Verify the JWT
    const payload: IUser = verify(aid, process.env.JWT_SECRET as string, {
      issuer: "Caching-Code-Login",
      audience: "Caching-Code-Auth",
    }) as IUser;

    // Get the user using the email
    const user = await getUserByEmail(payload.email);

    if (!user) {
      throw new Error("Authentication failed");
    }

    // Attach a user to the request
    req.user = user;

  //  Successfully authenticated. Call the next handler.
    next();
  } catch (error) {
    next(error);
  }
};
Thank you for reading this far, I hope you are liking it. Feel free to comment on your thoughts and jump into the next blog in the series.